


[Dual Bay RAID M.2 SATA Enclosure]-The M.2 RAID enclosure can let you maximize the performance of your M.2 (NGFF) SATA SSDs by taking advantage of USB 3.1 Gen 2 (10Gbps) protocol.
[Up to 850MB/s In RAID 0]-With multiple RAID options, the M.2 RAID enclosure can help to create larger storage space by setting SPAN(JBOD), or get significant speed bump in RAID 0 connecting USB C port.
[SSD and Device Compatibilities]-Support up to 4TB(2TB X 2). Only support M.2 (NGFF) SATA SSDs, compatible with multiple drive lengths:2230, 2242, 2260, 2280. Downwards compatible with USB3.0.
[Optional External Power Supply]-The 5 V power supply cable is provided for more stable running.The M.2 SATA RAID enclosure can also be powered directly from the USB port on your device, so the external power is optional.
[Outstanding Self-Cooling Structure]-Yottamaster Y-Sober series find the perfect balance between aesthetics and function(heat dissipation).
Small in stature. Big on capability
- The M.2 SATA RAID Enclosure is smaller and easier to fit into your workflow, studio and on stage. With two easy-access M.2 slots, support Hardware RAID 0, RAID 1, SAPN and PM(Normal) Modes. So it can easily serve any project need.
- USB 3.1 Gen 2 (10Gbps) protocol can unleashes the full potential of two M.2 (NGFF) SATA SSDs. In RAID 0 you'll experience the maximum sustained throughput from your drives with speeds up to 850MB/s, fast enough to handle your 4K workflows.
- Two kinds of data cables are included: USB C to USB A(6Gbps), USB C to USB C(10Gbps).

Two slots for different drive lengths:2230, 2242, 2260, 2280.
It only support M.2 (NGFF) SATA SSD.

The M.2 SATA RAID enclosure can be powered directly from the USB port on your device.
So the external power is optional. You can use it or not.
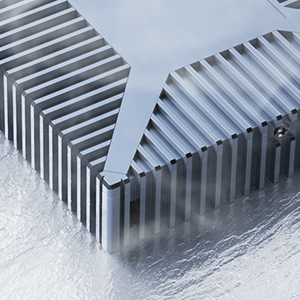
Increasing nearly 45% of the heat dissipation area, plus a silicone pad inside for better heat dissipation performance.

Note: The new SSD needs to be initialized and formatted before use
1. Toggle the dip switch to the RAID mode you need.
2. Hold the "SET" button and then connect the power cable / data cable to power it on. The indicator lights will flash quickly and then it will go out. When the indicator light flash and go out for the second time, the RAID setting is finished. Release the "SET" button and find your SSDs in "disk management".
3. After finishing the RAID setting, the new drive will show up in your disk management.
4. To change the RAID mode, please safely eject from the computer first, then repeat step 1 and 2 to finish your RAID setting.
